Volt 2012 Quick Charge and Use Guide

Whether it be classic Sealed Lead Acid or the latest EVehicle cells, how do you power your electric Kart?
Post Reply
User avatar
Jason
Site Admin
Posts: 46
Joined: Mon Nov 06, 2017 9:56 pm
Location: Michigan
Contact:

Volt 2012 Quick Charge and Use Guide

Post by Jason »

This is a quick guide to charge and use your 2012 era Volt battery pack. This is guide is the easiest way I found to setup the battery to work on a 6s charger. If you have a 12s charger, you should be able to adapt this guide for even easier use.

Please remember, there is a lot of power in this pack. Every metal contact on top is potential for a short. Keep the black cover on anytime you are not doing something with the tabs. Be careful of shorting solder, irons, or tools across those tabs! Working on your battery is at your own risk!

The first step to all this, is to make sure you get your pack properly compressed. Basically, you need to apply even pressure left to right to insure maximum battery life.


Rough Useful measurements. Here are some overall measurements of the battery, this will help you source the threaded rod and plate/angle for compressing the battery.
IMG_7734.JPG
IMG_7734.JPG (70.05 KiB) Viewed 68707 times
Note the size difference from the top. This is why we need the compression.
IMG_7732.JPG (68.45 KiB) Viewed 68707 times
IMG_7730.JPG
IMG_7730.JPG (67.92 KiB) Viewed 68707 times
Step 1: If your battery came without the clamp/threaded rod setup, you need to make one to put the cells into compression. My solution has been just angle steel and 1/4 -20 threaded rod. Found at any Lowes Depot or hardware store near you. (Below shown as received, cells not in compression)
Volt Battery as recieved.
IMG_7719.JPG (94.99 KiB) Viewed 68707 times
Angle Metal from hardware store
IMG_7726.JPG (60.4 KiB) Viewed 68707 times
Step 2:
Take your angle steel and cut it to size. I cut mine to about 9.5" You can make yours longer for your mounting application.
Cut your threaded rod to size. The two pieces of threaded rod are cut to about 10.5" You can leave them long for installation and trim them after.
Hardware after being cut to fit pack.
IMG_7737.JPG (73.32 KiB) Viewed 68707 times
Step 3: Push the threaded rod through the outermost holes. You may need to drill/grind your angle steel to line up properly. Then place lock nuts on either end.
Holes not aligning properly.
IMG_7738.JPG (54.67 KiB) Viewed 68707 times
Hole in steel extended for fitment.
IMG_7739.JPG (56.3 KiB) Viewed 68707 times
Step 4: Begin tightening down each side evenly. Make sure your cells, plates and plastic are all lining up. If the cells don't compress evenly, remove the rods and check for debris or misaligned plates internally. (You do not want to pinch one of the prismatic cells!) Because the top of the pack is about 9", I tightened the bottom to match. Keep in mind, to tighten both ends, you will need to hold/clamp the threaded rod. While I have run my pack like this for a few months now, the most correct way would be to probably use threaded rod through both top and bottom holes and a larger surface area plate for compression. However thus far, this seems to work fine, and I appear to be getting full capacity despite the age and wear on the battery.
Attachments
Tightening the pack up
IMG_7741.JPG (69.25 KiB) Viewed 68707 times
Competitions
Power Racing Series 2016,2017,2018 RocketPop and Raphael
Battlebots 2018 TANTRUM
User avatar
Jason
Site Admin
Posts: 46
Joined: Mon Nov 06, 2017 9:56 pm
Location: Michigan
Contact:

Re: Volt 2012 Quick Charge and Use Guide

Post by Jason »

The next step is getting the pack setup for charging and actually powering your devices!

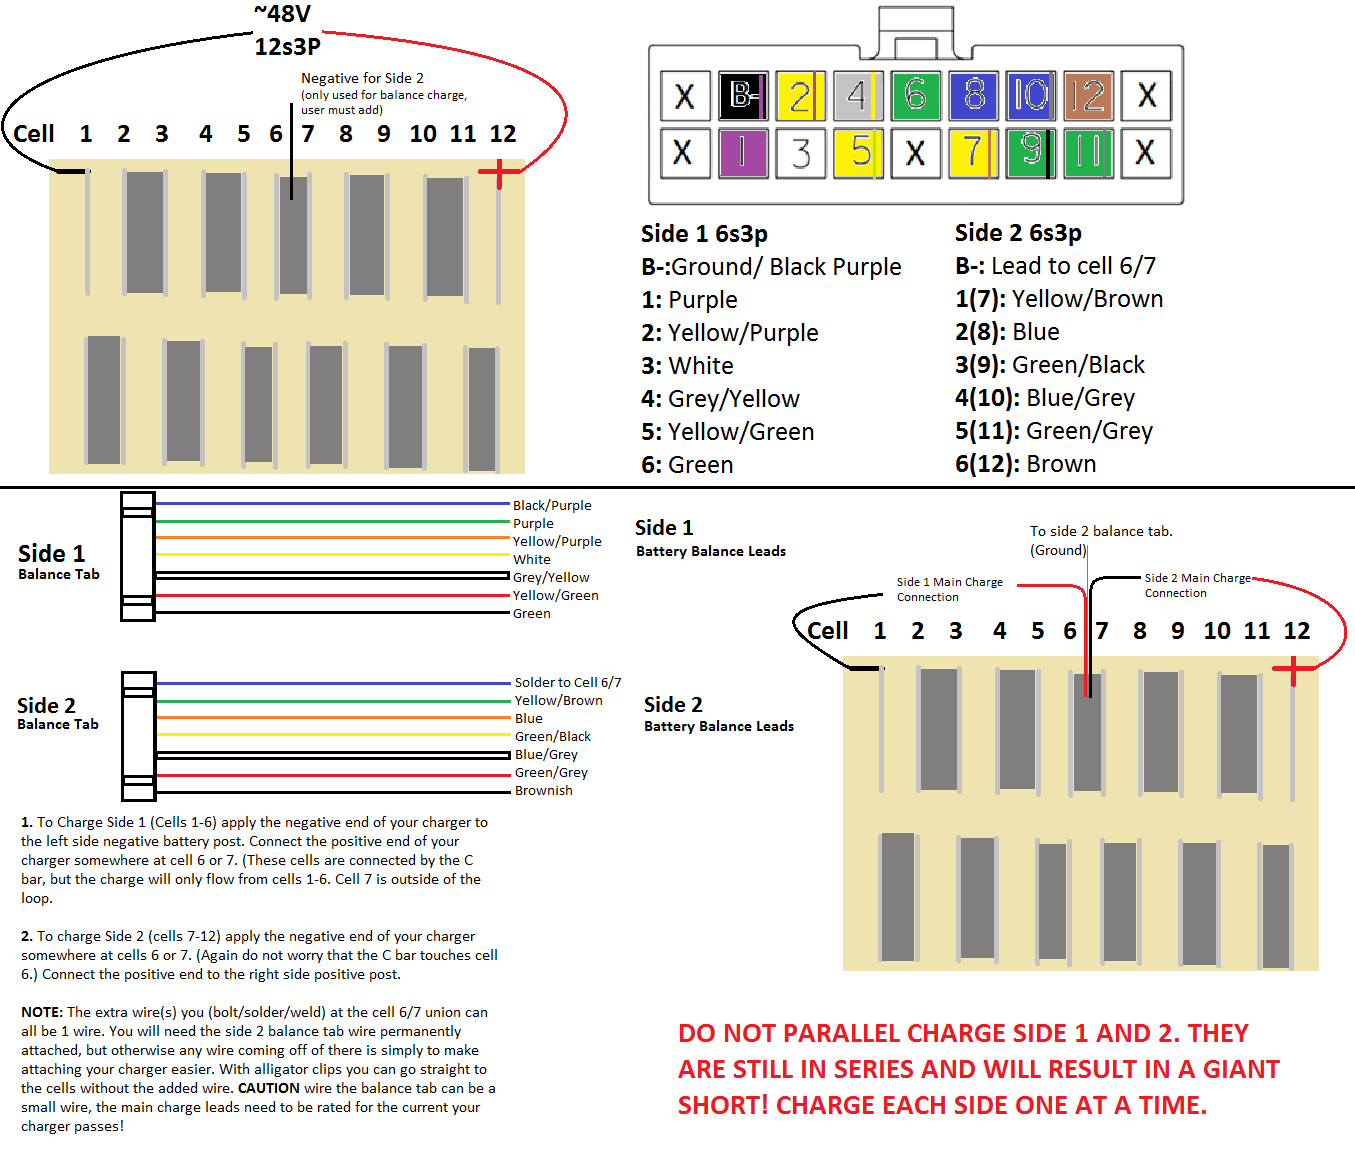
I have an up to 10s charger, but these packs are 12s. I am not ready to chop apart my pack, so I decided to set up the charger to charge the left side at 6s3p and the right side at 6s3p. To do this you can only charge each side one at a time, attempting to charge in parallel will cause a major short/spark and overall bad time. While this does not allow for the fastest charging possible, it allows you to not take the pack apart.

This diagram should get you started.
Full wiring document
VoltBattery.png (120.9 KiB) Viewed 68634 times
Original VOLT pinout including 12s and 6s
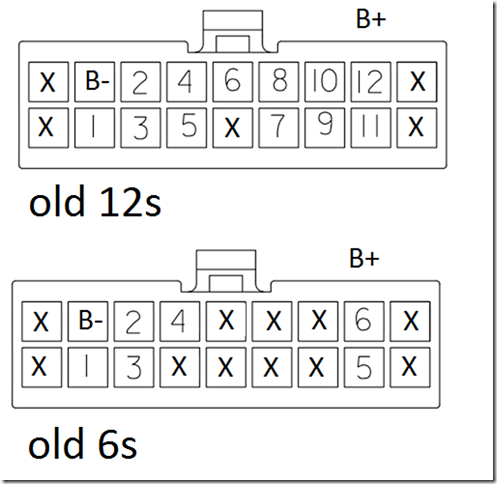
Volt Pinout
Volt Pinout
image[3].png (51.04 KiB) Viewed 68660 times
Step 1: Remove the orange balance tab connector from the VOLT battery, and cut the end off that does not plug into the battery pack. I stripped and soldered each wire to make it easy to attach to my balance leads later.
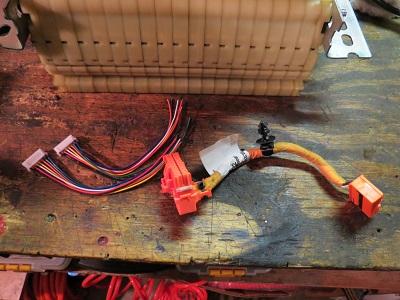
Wire removed, next to 6s balance leads.
IMG_7742.JPG (73.46 KiB) Viewed 68706 times
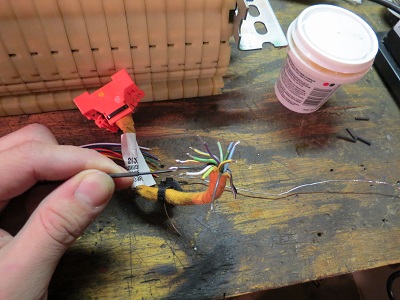
End cut off and soldered.
IMG_7749.JPG (65.35 KiB) Viewed 68706 times
Step 2: Solder and heat shrink each wire to the corresponding balance lead wire. Once these 7 wires are soldered (6 cells and a ground) You should be able to read the individual 1s3p voltages for Side 1 (Left side).
With my balance leads, the wiring goes like this.
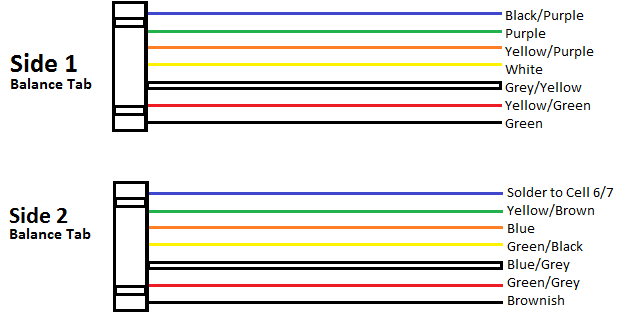
Leads
Leads
Balance Lead Wireing.png (9.07 KiB) Viewed 68634 times

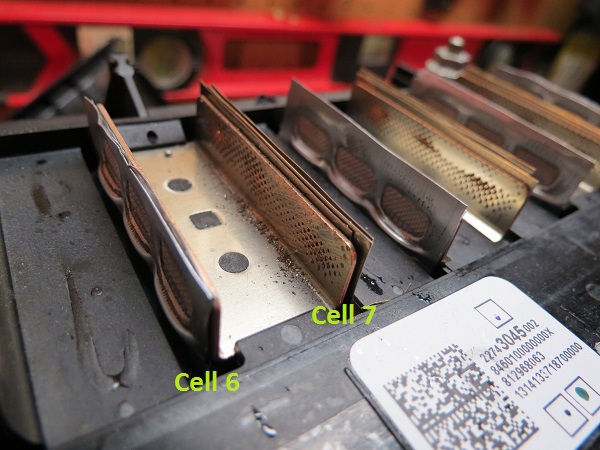
Step 3: Connecting a new ground lead for the Side 2 (Right side) Balance lead.
Because we are splitting the pack, we need the second balance lead to have a different ground point. Otherwise Side 2 would read all the way up to the full ~48v instead of being a second ~0-24v setup.

UPDATE!!*You should be able to use the existing balance wire from cell 6, and split it to be the ground tab for the second side*You can crimp, solder or weld this lead on. I was able to solder it with my soldering Iron at it's highest, filing the tab to rough it up, and applying lots of flux. I do not think this is the strongest connection, but it is good enough for a balance lead. However if you are going to use this same connection as part of your main charge line, make sure to use suitable gauge wire and a solid connection to prevent a high resistance spot due to a poor connection.
Filed for solder connection.
IMG_7757.JPG (112.14 KiB) Viewed 68706 times
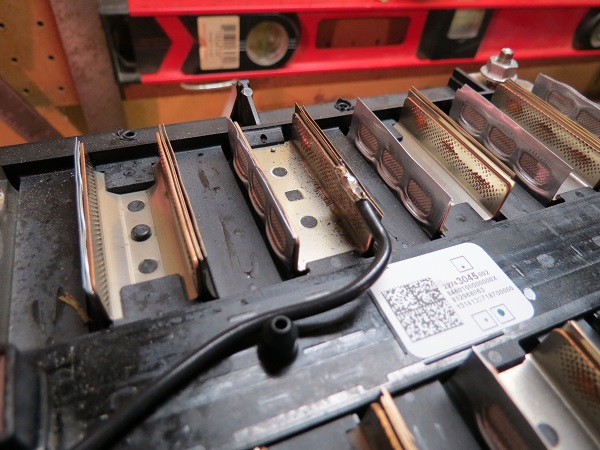
Balance lead for Side 2
IMG_7759.JPG (120.6 KiB) Viewed 68706 times
Step 4 Side 1: Test your connections with your charger. To charge and read Side 1, you should connect the negative lead of your charger to the left negative post on the battery. Connect the positive lead from your charger to anywhere on the cell 6/7 top connection. Plug in your Side 1 balance lead to your charger.
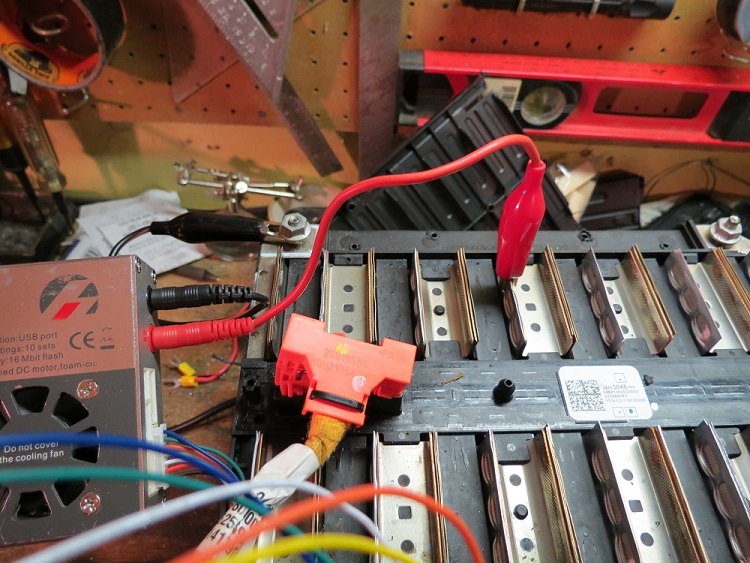
Connection of main leads to Side 1
IMG_7755.JPG (186.31 KiB) Viewed 68706 times
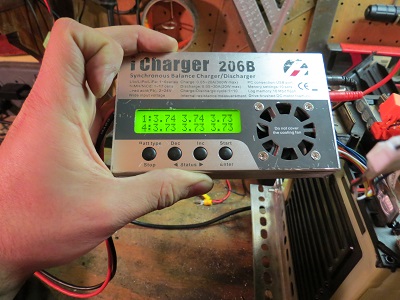
All 6 cells showing up
IMG_7754.JPG (69.4 KiB) Viewed 68706 times


Step 4 Side 2: Test your connections with your charger. To charge and read Side 2, you should connect the negative lead of your charger to somewhere on the cell 6/7 tab. Connect the positive lead from your charger to the top right positive battery post. Plug in your Side 2 balance lead to your charger.
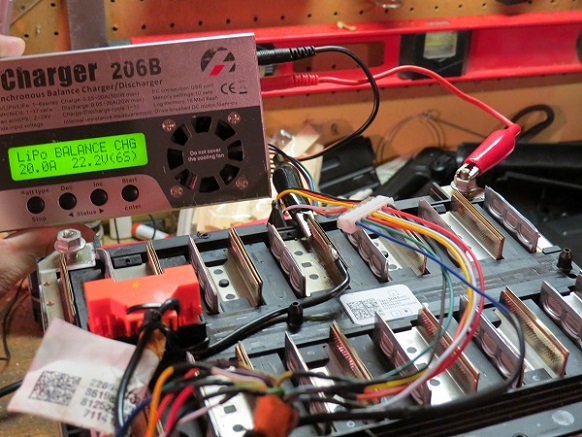
Connection of main leads to Side 2
IMG_7767.JPG (132.31 KiB) Viewed 68706 times

There you have it. You should now be able to set a charge voltage (I use a max voltage of 4.15v per cell), and charge each side to the same amount. Once it is all done the cells are within .01v-.02v from each other. To connect to something else, simply screw on a ring terminal and your favorite wire and connector to the negative post, and one to the positive post, just as you would any other battery.
Competitions
Power Racing Series 2016,2017,2018 RocketPop and Raphael
Battlebots 2018 TANTRUM
iancole
Posts: 2
Joined: Thu Nov 23, 2017 10:13 am

Re: Volt 2012 Quick Charge and Use Guide

Post by iancole »

Jason, THANK YOU for documenting this...

I'm considering splitting the bus bar tab between 6 & 7 so that we can dual charge. Is there a reason you chose not to do this that we should consider?
User avatar
Jason
Site Admin
Posts: 46
Joined: Mon Nov 06, 2017 9:56 pm
Location: Michigan
Contact:

Re: Volt 2012 Quick Charge and Use Guide

Post by Jason »

Actually I tried this on my battery. Despite completely separating the bus tab between 6 and 7, the main battery post still past 1v. I went ahead and attempted to parallel charge the two sides anyways. Some sparks and burnt insulation on the balance leads told me that was a bad idea. The running theory is there is some sort of thermal circuit underneath the black plastic that is still connecting the series chain.
Competitions
Power Racing Series 2016,2017,2018 RocketPop and Raphael
Battlebots 2018 TANTRUM
iancole
Posts: 2
Joined: Thu Nov 23, 2017 10:13 am

Re: Volt 2012 Quick Charge and Use Guide

Post by iancole »

We may need to completely tear down one of these...for science!
User avatar
Jason
Site Admin
Posts: 46
Joined: Mon Nov 06, 2017 9:56 pm
Location: Michigan
Contact:

Re: Volt 2012 Quick Charge and Use Guide

Post by Jason »

That seems to be the case!

While we are on the subject, I figure I need to start putting more useful links about the VOLT battery that I find into one place. I keep finding and losing them. So here is a start list so far.

Electric motorcycle build, including cell seperation
http://www.schultzengineering.us/delta-11-12.htm
Longest most information thread
http://www.diyelectriccar.com/forums/sh ... 01p16.html
More information of electric car cells
https://endless-sphere.com/forums/viewtopic.php?t=89680

Cell Information (From McRat on diyelectriccar.com)
Post Link http://www.diyelectriccar.com/forums/sh ... 101p7.html
Post info
OK, a single naked cell is 381 grams, and the "sack" is 6.5" x 9" x 0.219" thick. So the whole 288 cells weighs 241 lb. The aircooling plates are 20lb.
The "ears" are tinned copper and stick out the top about 1" before you cut the weld off. They are 1.750" wide and 0.010" thick. After you cut the ears at the weld, you have about .300" worth of clamp surface.
Volt Single Cell
Volt Single Cell
IMG_1260[1].JPG (349.29 KiB) Viewed 68585 times
More Shameless internet finds.
Volt Battery Split Side 2017
IMG_8934.jpg (307.74 KiB) Viewed 68474 times
Volt Battery Split 2016
jill-chevy-volt-2016-test-drive-12-889x675.jpg (129.7 KiB) Viewed 68474 times
Competitions
Power Racing Series 2016,2017,2018 RocketPop and Raphael
Battlebots 2018 TANTRUM
Jacob_Saxon
Posts: 1
Joined: Sat Mar 24, 2018 10:57 pm

Re: Volt 2012 Quick Charge and Use Guide

Post by Jacob_Saxon »

Thank you so much for posting this guide. It was all really helpful, especially the original bms cable pinout. Did you ever figure out a better way to compress the pack? Or is the single piece of angle bracket working fine?
User avatar
Jason
Site Admin
Posts: 46
Joined: Mon Nov 06, 2017 9:56 pm
Location: Michigan
Contact:

Re: Volt 2012 Quick Charge and Use Guide

Post by Jason »

The batteries have been sitting idle since November. Once I bring them out of hibernation we will see how they look. For the most part the single piece of angle iron (or anything really) seems to be working fine. I picked up a damaged pack for science and am still planning to try and break it down to the cell in order to build 3 packs from 1 of these. Hopefully by the opening race in California we will have 3, 12s1p packs.... as well as new steering :)
Competitions
Power Racing Series 2016,2017,2018 RocketPop and Raphael
Battlebots 2018 TANTRUM
Scott
Posts: 4
Joined: Mon Jun 04, 2018 1:23 pm

Re: Volt 2012 Quick Charge and Use Guide

Post by Scott »

Adding for the record:

The balance port connector is a proprietary connector and is no longer available. However the Molex Mini-Fit JR 18P connector will fit the port, but the retaining features do not lock.

OEM Connector: Link print

Molex Connector: Amazon Mouser
Post Reply